How to Disable Weak SSL Protocols and Ciphers in IIS

I recently undertook the process of moving websites to different servers here at work. This required that university networking group scan the new webserver with a tool called Nessus. Unfortunately this turned up several errors, all of them had to do with Secure Sockets Layer or SSL which in Microsoft Windows Server 2003 / Internet Information Server 6 out of the box support both unsecure protocols and cipher suites. These problems would have to be solved before they would allow the new server though the firewalls. The report they university sent me was generated by Nessus generated errors like this:

SSL Version 2 (v2) Protocol Detection

Synopsis :

The remote service encrypts traffic using a protocol with known
weaknesses.

Description :

The remote service accepts connections encrypted using SSL 2.0, which
reportedly suffers from several cryptographic flaws and has been
deprecated for several years. An attacker may be able to exploit
these issues to conduct man-in-the-middle attacks or decrypt
communications between the affected service and clients.

See also :

http://www.schneier.com/paper-ssl.pdf
http://support.microsoft.com/kb/187498
http://www.linux4beginners.info/node/disable-sslv2

Solution :

Consult the application's documentation to disable SSL 2.0 and use SSL
3.0 or TLS 1.0 instead.

Risk factor :

Medium / CVSS Base Score : 5.0
(CVSS2#AV:N/AC:L/Au:N/C:P/I:N/A:N)

Nessus ID : 20007
----------------------------------------------------------
SSL Medium Strength Cipher Suites Supported

Synopsis :

The remote service supports the use of medium strength SSL ciphers.

Description :

The remote host supports the use of SSL ciphers that offer medium
strength encryption, which we currently regard as those with key
lengths at least 56 bits and less than 112 bits.

Note: This is considerably easier to exploit if the attacker is on the
same physical network.

Solution :

Reconfigure the affected application if possible to avoid use of
medium strength ciphers.

Risk factor :

Medium / CVSS Base Score : 4.3
(CVSS2#AV:N/AC:M/Au:N/C:P/I:N/A:N)

Plugin output :

Here are the medium strength SSL ciphers supported by the remote server :

Medium Strength Ciphers (>= 56-bit and < 112-bit key)
SSLv2
DES-CBC-MD5 Kx=RSA Au=RSA Enc=DES(56) Mac=MD5
SSLv3
DES-CBC-SHA Kx=RSA Au=RSA Enc=DES(56) Mac=SHA1
TLSv1
EXP1024-DES-CBC-SHA Kx=RSA(1024) Au=RSA Enc=DES(56) Mac=SHA1 export
EXP1024-RC4-SHA Kx=RSA(1024) Au=RSA Enc=RC4(56) Mac=SHA1 export
DES-CBC-SHA Kx=RSA Au=RSA Enc=DES(56) Mac=SHA1

The fields above are :

{OpenSSL ciphername}
Kx={key exchange}
Au={authentication}
Enc={symmetric encryption method}
Mac={message authentication code}
{export flag}

Nessus ID : 42873
--------------------------------------------------------------------
SSL Weak Cipher Suites Supported

Synopsis :

The remote service supports the use of weak SSL ciphers.

Description :

The remote host supports the use of SSL ciphers that offer either weak
encryption or no encryption at all.

Note: This is considerably easier to exploit if the attacker is on the
same physical network.

See also :

http://www.openssl.org/docs/apps/ciphers.html

Solution :

Reconfigure the affected application if possible to avoid use of weak
ciphers.

Risk factor :

Medium / CVSS Base Score : 4.3
(CVSS2#AV:N/AC:M/Au:N/C:P/I:N/A:N)

Plugin output :

Here is the list of weak SSL ciphers supported by the remote server :

Low Strength Ciphers (< 56-bit key)
SSLv2
EXP-RC2-CBC-MD5 Kx=RSA(512) Au=RSA Enc=RC2(40) Mac=MD5 export
EXP-RC4-MD5 Kx=RSA(512) Au=RSA Enc=RC4(40) Mac=MD5 export
SSLv3
EXP-RC2-CBC-MD5 Kx=RSA(512) Au=RSA Enc=RC2(40) Mac=MD5 export
EXP-RC4-MD5 Kx=RSA(512) Au=RSA Enc=RC4(40) Mac=MD5 export
TLSv1
EXP-RC2-CBC-MD5 Kx=RSA(512) Au=RSA Enc=RC2(40) Mac=MD5 export
EXP-RC4-MD5 Kx=RSA(512) Au=RSA Enc=RC4(40) Mac=MD5 export

The fields above are :

{OpenSSL ciphername}
Kx={key exchange}
Au={authentication}
Enc={symmetric encryption method}
Mac={message authentication code}
{export flag}

Other references : CWE:327, CWE:326, CWE:753, CWE:803, CWE:720

Nessus ID : 26928
-----------------------------------------------------------------

These three error messages pretty much mean that you need to turn off SSL 2.0 due to exploits that were found after the standard was created. You need to turn off any encryption suites lower than 128bits. The third error message says we need to turn off anything for less than 56bits, but this will be accomplished by turning of anything less than 128bits. Basically your are modifying the settings that restrict the use of specific protocols and ciphers that are used by the schannel.dll. More detailed information can be found at Micorsoft’s KB187498 or KB245030

How do we do this?

Disabling SSL 2.0 on IIS 6

  1. Open up “regedit” from the command line
  2. Browse to the following key:
    HKLM\SYSTEM\CurrentControlSet\Control\SecurityProviders\SCHANNEL\Protocols\SSL 2.0\Server
  3. Create a new REG_DWORD called “Enabled” and set the value to 0
  4. You will need to restart the computer for this change to take effect. (you can wait on this if you also need to disable the ciphers)

Disable unsecure encryption ciphers less than 128bit

  1. Open up “regedit” from the command line
  2. Browse to the following key:
    HKLM\SYSTEM\CurrentControlSet\Control\SecurityProviders\SCHANNEL\Ciphers\DES 56/56
  3. Create a new REG_DWORD called “Enabled” and set the value to 0
  4. Browse to the following key:
    HKLM\SYSTEM\CurrentControlSet\Control\SecurityProviders\SCHANNEL\Ciphers\RC2 40/128
  5. Create a new REG_DWORD called “Enabled” and set the value to 0
  6. Browse to the following key:
    HKLM\SYSTEM\CurrentControlSet\Control\SecurityProviders\SCHANNEL\Ciphers\RC4 40/128
  7. Create a new REG_DWORD called “Enabled” and set the value to 0
  8. Browse to the following key:
    HKLM\SYSTEM\CurrentControlSet\Control\SecurityProviders\SCHANNEL\Ciphers\RC4 56/128
  9. Create a new REG_DWORD called “Enabled” and set the value to 0
  10. You will need to restart the computer for this change to take effect.

How to verify the changes?

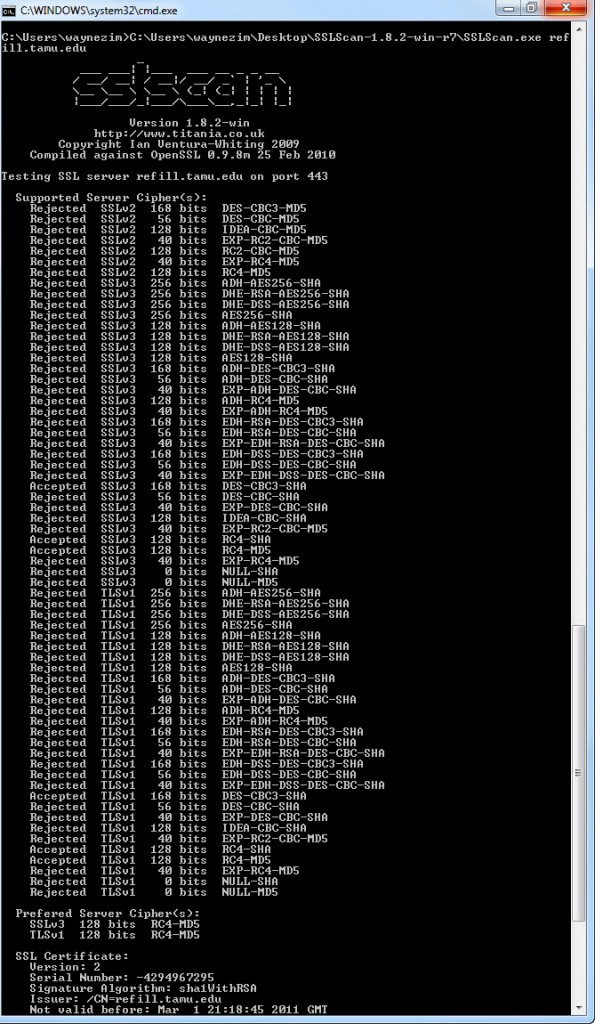
Now that you have made these changes how can you be sure that they have taken place without having to go to your boss or higher authority just to find that you did them wrong. Well I found a nice tool called SSL-SCAN which you can download at http://code.google.com/p/sslscan-win/ for the Windows port or you can download an compile for your favorite operating system at the original project SSL-SCAN siteĀ http://sourceforge.net/projects/sslscan/. This tool provides some great detail about what is allows and not allows plus some analysis of the SSL certificate itself.

Below the screen shot shows that we have disabled any ciphers that attempt to use the SSL 2.0 protocol and we’ve disabled all ciphers that less than 128bit.
Read More

How to Set Permission on a Service Using Subinacl

A couple of months back I was installed some communication software that made a VPN connection to the main server. It used OpenVPN to establish the connection and worked fine as long as your were an administrator on the PC. As I researched it further it installed a service and required that service to run on demand when the user launch the program. Since your standard limited user does not have privileges to start and stop services the application would fail to connect to the server.

So now the question becomes, how do you add permissions to a service?

Microsoft has an answer with a little known command line application called subinacl. This application allows you to view and edit security information for files, registry keys, and services. This can be handy if you are writing a script to change permissions on registry keys or files but the real power lies within the ability to edit the security information on services.

The syntax for subinacl: SUBINACL /SERVICE \\MachineName\ServiceName /GRANT=[DomainName\]UserName[=Access]

The Access parameter is broken down like this:

F : Full Control
R : Generic Read
W : Generic Write
X : Generic eXecute
L : Read controL
Q : Query Service Configuration
S : Query Service Status
E : Enumerate Dependent Services
C : Service Change Configuration
T : Start Service
O : Stop Service
P : Pause/Continue Service
I : Interrogate Service
U : Service User-Defined Control Commands

For my example I just needed to allow the Domain Users group access to run the OpenVPN service.

subinacl /service OpenVPN /GRANT=DOMAIN\Domain Users=TO

You may need to execute this from the folder where subinacl.exe is located. Also if it is running the command on a local system you can just type the name of the service and not the UNC path to the service.

Download subinacl.exe from Microsoft
For more information about this command please visit: http://support.microsoft.com/kb/288129

Read More

Weekly Terminal Services Connection Report using VBS

A few weeks ago we had some state auditors come by and mention that we should review our logs for any sort of outside / vendor access. I knew that going to each server and reviewing the logs manually would be very time consuming and not really provide solid documentation that it was done. I decided that the only way to solve this problem was with a report of some nature. I fired up my trusty Crystal Reports and started to view the logs using that, once I got in to more I realized that when I added the description field of the event log it always crashed Crystal Reports. This left me going to plan B which is writing the reports from scratch using Visual Basic Scripting language.

I already knew that you can use VBS to connect to WMI (Windows Management Interface) and view different parts of the system including the event log, so I spent the morning writing the report and parsing it down to the detail that I really needed. Then I decided to take it to the next level by adding in recursion for multiple servers and also set it up to send an HTML email so it is easy to review every week. Why every week you may ask, well in looking at my event log on my domain server I noticed that I start losing Security events at about 10-14 days out since it is authorizing so much, and a weekly task is a very manageable one.

Script Configuration

  1. Configure the servers that this script will report on. Modify the Servers array for each server that needs to be checked. (Note: all servers need the same login credentials for the script to work)
  2. Find the objMessage.From field and update it with who the email is coming from
  3. Find the objMessage.To Field and update with the email address of the person who will be receiving the report, if you have multiple addresses to send to separate them with a semi-colon (;)
  4. Find the (“http://schemas.microsoft.com/cdo/configuration/smtpserver”) = “smtp-relay.waynezim.com” and update this with your SMTP server, if your server requires authentication you will need to modify this script to include that, a simple Google search should show you what needs to be changed.
  5. This script should be setup to be a scheduled task on one of your servers, the credentials used in setting up the job will be used to connect to the other servers, this account needs to exist on all servers to view the Security Event Log and make the report.
  6. To setup a scheduled task, go to your Control Panel, open Scheduled Tasks, right click New > Scheduled Task, name it, then right click and modify the Properties, Browse to where the script is saved, set the Run as at the bottom for the user that exists on all Servers and set the password. Then go to the Schedule tab and set it to Weekly and change it to run when you want it to.
Dim objWMI, objEvent ' Objects
Dim strComputer ' Strings
Dim intEvent, intNumberID, intRecordNum, colLoggedEvents
'--------------------------------------------
' Server List to Parse Logs
Dim Servers(5)
Servers(0) = "server1"
Servers(1) = "server2"
Servers(2) = "server3"
Servers(3) = "server4"
Servers(4) = "server5"
Servers(5) = "server6"
'--------------------------------------------
' Email Body Heading
HTMLMsg = "<html><body><h3>Remote Desktop Connections from " & cDate(Now() - 7) & " to " & cDate(Now()) & "</h3>"
HTMLMsg = HTMLMsg & "<table border=1><tr><td><b>Computer Name</b></td><td><b>Logon Type</b></td><td><b>Remote IP</b></td><td><b>Date / Time</b></td><td><b>User</b></td></tr>"
'--------------------------------------------
' Next section creates the file to store Events
' Then creates WMI connector to the Logs

'Range Variable - Out of Loop for Common Report Time
WeekAgo = cDate(Now() - 7)

'Start Each Computer Loop
For Each strComputer in Servers
' --------------------------------------------
' Set your variables for Events Loop
intEvent = 1
intRecordNum = 1

Set objWMI = GetObject("winmgmts:" _
& "{impersonationLevel=impersonate}!\\" _
& strComputer & "\root\cimv2")
Set colLoggedEvents = objWMI.ExecQuery _
("Select * from Win32_NTLogEvent Where Logfile = 'Security' AND EventCode = 528 AND TimeWritten > '" & WeekAgo & "'")
' -----------------------------------------
' Next section loops through ID properties
intEvent = 1
	For Each objEvent in colLoggedEvents

	HTMLMsg = HTMLMsg & "<tr><td>" & objEvent.ComputerName & "</td>"
	LogonType = RTrim(Mid(objEvent.Message,InStr(objEvent.Message,"Logon Type:")+12,2))
	If LogonType = 2 Then HTMLMsg = HTMLMsg & "<td>Interactive</td>" End if
	If LogonType = 3 Then HTMLMsg = HTMLMsg & "<td>Network</td>" End if
	If LogonType = 4 Then HTMLMsg = HTMLMsg & "<td>Batch</td>" End if
	If LogonType = 5 Then HTMLMsg = HTMLMsg & "<td>Service</td>" End if
	If LogonType = 7 Then HTMLMsg = HTMLMsg & "<td>Unlock</td>" End if
	If LogonType = 8 Then HTMLMsg = HTMLMsg & "<td>Network using Clear Text</td>" End if
	If LogonType = 9 Then HTMLMsg = HTMLMsg & "<td>New Credentials</td>" End if
	If LogonType = 10 Then HTMLMsg = HTMLMsg & "<td>Remote Interactive</td>" End if
	If LogonType = 11 Then HTMLMsg = HTMLMsg & "<td>Cached Interaction</td>" End if

	IPlen = InStr(InStr(objEvent.Message,"Source Network Address:")+24,objEvent.Message,"	") - InStr(objEvent.Message,"Source Network Address:") - 28
	RemoteAddress = RTrim(Mid(objEvent.Message,InStr(objEvent.Message,"Source Network Address:")+24,IPlen))
	HTMLMsg = HTMLMsg & "<td>" & RemoteAddress & "</td>"
	EventTime = Mid(objEvent.TimeWritten, 5, 2) & "/" & Mid(objEvent.TimeWritten, 7, 2) & "/" & Mid(objEvent.TimeWritten, 1, 4) & " " & Mid(objEvent.TimeWritten, 9, 2) & ":" & Mid(objEvent.TimeWritten, 11, 2) & "." & Mid(objEvent.TimeWritten, 13, 2)
	HTMLMsg = HTMLMsg & "<td>" & EventTime & "</td>"
	HTMLMsg = HTMLMsg & "<td>" & objEvent.User & "</td></tr>"
	intRecordNum = intRecordNum +1
	IntEvent = intEvent +1

	Next
Next

Set objMessage = CreateObject("CDO.Message")
objMessage.Subject = "Remote Connections Report: " & cDate(Now())
objMessage.From = "root@waynezim.com"
objMessage.To = "waynezim@waynezim.com"
objMessage.HTMLBody = HTMLMsg
'==This section provides the configuration information for the remote SMTP server.
'==Normally you will only change the server name or IP.
objMessage.Configuration.Fields.Item _
("http://schemas.microsoft.com/cdo/configuration/sendusing") = 2
'Name or IP of Remote SMTP Server
objMessage.Configuration.Fields.Item _
("http://schemas.microsoft.com/cdo/configuration/smtpserver") = "smtp-relay.waynezim.com"
'Server port (typically 25)
objMessage.Configuration.Fields.Item _
("http://schemas.microsoft.com/cdo/configuration/smtpserverport") = 25
objMessage.Configuration.Fields.Update
'==End remote SMTP server configuration section==

objMessage.Send
WScript.Quit

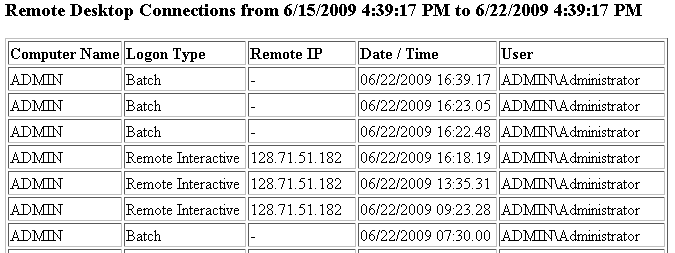
Report Preview
If you need help decoding what Logon Type really means check out this great article.

remote-connection-report-preview

Read More

How to Deploy VNC using Group Policy

Do you spend too much time running from desk to desk just to help someone make a shortcut or change the default printer? This could be the solution for you. Using UltraVNC you can remotely view and control their workstation from your desk. This can save you time from running around everywhere, and make your users happier faster by solving their problems on the spot. You can also make your boss happy be making it authenticate with Active Directory. That will ensure that everyone that has the remote support access uses their own username and password, and it is easily managed with Active Directory Groups. VNC works very simply by installing a server on every workstation which allows it to share out the desktop to other clients / viewer programs. By installing the VNC Server on all your workstations it will allow you to connect using the client / viewer application and provide hands on support directly from your workstation.

Requirements

Making the MSI using VNCed
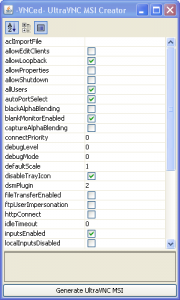
Now that you have the required software, the first thing we need to do is uncompress the VNCed UltraVNC MSI Creator to a folder on your desktop. Once completed, run the run.bat and it should popup a GUI interface you can use to configure different parts of the UltraVNC Server.VNCed UltraVNC MSI Maker
Using this interface you can adjust and explore what options you have to choose from to customize your UltraVNC Deployment for your environment. The defaults here are a pretty good start and you can click on each item to get a description of what it will change. You may want to install this to a test computer a few times before rolling it out.
At this time you also need to configure if you will be using if you will be using Active Directory Authentication or just a plain password.

– To setup the plain password just fill out the password item and leave the newMSLogon unchecked.
– To setup Active Directory Authentication check the newMSLogon and you will need to make a file to select for aclImportFile. This file can either be generated based on the UltraVNC Instructions or you can use my file by creating a text file called: MSACL.ini and pasting allow 0x00000003 "..\Domain Admins in to it. That will allow anyone in the Domain Admins group to have full access to any machine setup using this MSI.

Once you have finished configuring the options for UltraVNC hit the Generate UltraVNC MSI button at the bottom. This will generate your UltraVNC.msi in the folder in which VNCed was extracted to. This file is what you will use to deploy UltraVNC to your workstations.

Using Group Policy to Deploy the MSI
First you will need to open either your Group Policy Management Console (gpmc.msc) and either modify your existing Workstation Group Policy or make a new one just for the deployment of this application depending on how you want to deploy it. By making a different GP to install, it can allow you deploy it just to a few machines, and only change the settings on those machines, where as the workstation method installs it to all workstations. This really up to the requirements of your environment. Either way you will need to look under Group Policy Object for your domain and create one or right click on one and edit it.Group Policy Software Installation
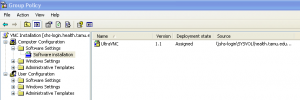
Now use the Tree on the Left to browse to Computer Configuration > Software Settings > Software Installation and right click on Software Installation and select New > Package… It will now prompt you with an open dialog box, go and select the MSI that we created earlier. If all goes well you should end up with something like the screenshot shows to the left. If all goes well now the only thing you have to do is link it to the OUs that you want it to effect if you created a new one , or you let your workstation group policy deploy to all the workstations the next time they restart.

Firewall ConfigurationGroup Policy Firewall Configuration for UltraVNC
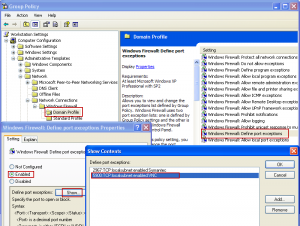
If you run a firewall on your machine you will need to allow port 5900 open. If you only running the default Windows Firewall you can configure this using the same group policy that you deployed UltraVNC with. Just go to Computer Configuration > Administrative Templates > Network > Network Connections > Windows Firewall > Domain Profile then select Windows Firewall: Define port exceptions select Enabled then click the Show… button and click Add and fill out the items to specification.

For any other questions you have feel free to leave a comment I will be happy to assist you with the deployment.

For any other detailed information about UltraVNC you should check out their website at http://www.uvnc.com

Read More

List Local Accounts from Computers in Active Directory

When you finally take the plunge and decided that the only way to take your business to the next level is to setup a true client/server environment, here is a script to help you clean up those old accounts. When you convert to an Active Directory structure, you need to remove all the old local user accounts. This will reduce the security risks by removing accounts that you can’t force to conform to the rules setup by Group Policy. Also, if you were running these users as Administrators or Power Users and now have limited them down to a Standard user, without removing their old local accounts they may have elevated rights that they don’t need. Using this script you can query every computer in you Active Directory and get a list in CSV that you can use to know where that accounts are that need to be removed. In this script you can modify the output file so you can save the file where you want. You will also need to modify the Active Directory information to match your Domain configuration.

Tip: You can remotely connect other computers on your domain using “compmgmt.msc /computer:[remote computer]” from there you can manage user accounts in Local Users and Groups.

Const ADS_SCOPE_SUBTREE = 2

Set objConnection = CreateObject("ADODB.Connection")
Set objCommand =   CreateObject("ADODB.Command")
objConnection.Provider = "ADsDSOObject"
objConnection.Open "MYDomainController" 'put domain controller here

Set objCOmmand.ActiveConnection = objConnection
objCommand.CommandText = _
    "Select Name, Location from LDAP://DC=subdomain,DC=zim,DC=local' " _  'update this with your AD information
        & "Where objectClass='computer'"  
objCommand.Properties("Page Size") = 1000
objCommand.Properties("Searchscope") = ADS_SCOPE_SUBTREE 
Set objRecordSet = objCommand.Execute
objRecordSet.MoveFirst

Do Until objRecordSet.EOF
	LocalUsers objRecordSet.Fields("Name").Value, "C:\localaccounts.csv" 'adjust output file name as needed
    objRecordSet.MoveNext
Loop

Sub LocalUsers(strComputer, strFilename)
	On Error Resume Next
	Set StdOut = WScript.StdOut
	 
	Set objFSO = CreateObject("scripting.filesystemobject")
	Set logStream = objFSO.opentextfile(strFilename, 8, True)
	 
	Set oReg=GetObject("winmgmts:{impersonationLevel=impersonate}!\\" & strComputer & "\root\default:StdRegProv")
	If Err.Number Then
	      logStream.writeline(strComputer & ",Offline")
	      Err.Clear
	Else
		Set colAccounts = GetObject("WinNT://" & strComputer)
		colAccounts.Filter = Array("user")

		For Each objUser In colAccounts
		        logStream.writeline(strComputer & ",Online," & objUser.Name & "," & objUser.AccountDisabled) 
		Next
	End If

	logStream.Close
End Sub

Read More