Keeping Windows Time Synchronized

Over the years I have managed a few applications that are time sensitive in recording when certain things were logged. This has caused issues when some computers update time and some get behind. Users have trouble understanding why they did something at one time but it was recorded as another. I did find a few commands that can help remedy this problem.

To check Windows Time Service configuration.

w32tm /query /configuration

To configure a standalone server or domain controller for an external time source.

w32tm /config /update /manualpeerlist:"0.pool.ntp.org,0x8 1.pool.ntp.org,0x8 2.pool.ntp.org,0x8 3.pool.ntp.org,0x8" /syncfromflags:MANUAL

To force update to time source.

w32tm /resync

Source: WindowsTimeService < Support < NTP.
Source: Microsoft Technet: Windows Time Service Tools and Settings

Read More

How to Set Permission on a Service Using Subinacl

A couple of months back I was installed some communication software that made a VPN connection to the main server. It used OpenVPN to establish the connection and worked fine as long as your were an administrator on the PC. As I researched it further it installed a service and required that service to run on demand when the user launch the program. Since your standard limited user does not have privileges to start and stop services the application would fail to connect to the server.

So now the question becomes, how do you add permissions to a service?

Microsoft has an answer with a little known command line application called subinacl. This application allows you to view and edit security information for files, registry keys, and services. This can be handy if you are writing a script to change permissions on registry keys or files but the real power lies within the ability to edit the security information on services.

The syntax for subinacl: SUBINACL /SERVICE \\MachineName\ServiceName /GRANT=[DomainName\]UserName[=Access]

The Access parameter is broken down like this:

F : Full Control
R : Generic Read
W : Generic Write
X : Generic eXecute
L : Read controL
Q : Query Service Configuration
S : Query Service Status
E : Enumerate Dependent Services
C : Service Change Configuration
T : Start Service
O : Stop Service
P : Pause/Continue Service
I : Interrogate Service
U : Service User-Defined Control Commands

For my example I just needed to allow the Domain Users group access to run the OpenVPN service.

subinacl /service OpenVPN /GRANT=DOMAIN\Domain Users=TO

You may need to execute this from the folder where subinacl.exe is located. Also if it is running the command on a local system you can just type the name of the service and not the UNC path to the service.

Download subinacl.exe from Microsoft
For more information about this command please visit: http://support.microsoft.com/kb/288129

Read More

Report Workstation Uptime in a CSV using Active Directory and VBS

Have you ever been left wondering which computers on your domain have been neglected by their user and not restarted in forever? This is a question that come up in my office every once and a while. One of the easiest ways to solve this problem is to ask WMI for when the computer was last restarted and subtract it from the current time. Also, while asking WMI questions you might as well ask which user is currently logged on the PC that way you know who to blame. This is exactly what the following script does for your domain. It grabs the list of workstations from the domain then queries WMI for the last time the computer is restarted and does some conversion and math and makes you an nice CSV that you can play with.

Script Configuration
Before running this script there is some minor configuration that must be done so it can communicate with your Active Directory setup.

  1. Find objConnection.Open “Active Directory Server” change Active Directory Server to the name of your Domain Controller
  2. Find objCommand.CommandText = _
    “Select Name, Location from ‘LDAP://OU=Workstations,DC=west,DC=domain,DC=edu’ ” _
    & “Where objectClass=’computer'”
    change subdomain, domain, and suffix to the name of your domain i.e. west domain edu (respectively)
  3. Find GetUptime objRecordSet.Fields(“Name”).Value, “C:\uptime.csv” and change C:\uptime.csv to the location where you want the file saved. Be sure to save it with the extension CSV
Const ADS_SCOPE_SUBTREE = 2

Set objConnection = CreateObject("ADODB.Connection")
Set objCommand =   CreateObject("ADODB.Command")
objConnection.Provider = "ADsDSOObject"
objConnection.Open "Active Directory Server" 

Set objCOmmand.ActiveConnection = objConnection
objCommand.CommandText = _
    "Select Name, Location from 'OU=Workstations,DC=west,DC=domain,DC=edu' " _
        & "Where objectClass='computer'"  
objCommand.Properties("Page Size") = 1000
objCommand.Properties("Searchscope") = ADS_SCOPE_SUBTREE 
Set objRecordSet = objCommand.Execute
objRecordSet.MoveFirst

Do Until objRecordSet.EOF
	GetUptime objRecordSet.Fields("Name").Value, "C:\uptime.csv"
    objRecordSet.MoveNext
Loop

Sub GetUptime(strComputer, strFilename)
	On Error Resume Next
	Set StdOut = WScript.StdOut
	 
	Set objFSO = CreateObject("scripting.filesystemobject")
	Set logStream = objFSO.opentextfile(strFilename, 8, True)
	 
	Set oReg=GetObject("winmgmts:{impersonationLevel=impersonate}!\\" & strComputer & "\root\default:StdRegProv")
	If Err.Number Then
	      logStream.writeline(strComputer & ",Offline")
	      Err.Clear
	Else
		Set objWMIService = GetObject _
			("winmgmts:\\" & strComputer & "\root\cimv2")
		Set colOperatingSystems = objWMIService.ExecQuery _
			("Select * from Win32_OperatingSystem")
		For Each objOS in colOperatingSystems
			dtmBootup = objOS.LastBootUpTime
			dtmLastBootupTime = WMIDateStringToDate(dtmBootup)
			dtmSystemUptime = DateDiff("h", dtmLastBootUpTime, Now()) 
		Next
		Set objWMIService = GetObject _
			("winmgmts:\\" & strComputer & "\root\cimv2")
		Set colComputerSys = objWMIService.ExecQuery _
			("Select UserName from Win32_ComputerSystem")
		For Each objCS in colComputerSys
			username = objCS.UserName
			logStream.writeline(strComputer & ",Online," & dtmSystemUptime & "," & dtmLastBootupTime & "," & username) 
		Next
				
	End If
	logStream.Close
End Sub
Function WMIDateStringToDate(dtmBootup)
    WMIDateStringToDate = CDate(Mid(dtmBootup, 5, 2) & "/" & _
         Mid(dtmBootup, 7, 2) & "/" & Left(dtmBootup, 4) _
         & " " & Mid (dtmBootup, 9, 2) & ":" & _
         Mid(dtmBootup, 11, 2) & ":" & Mid(dtmBootup, _
         13, 2))
End Function

Read More
How to Use WMI Filtering to Improve Group Policy Administration

Group policy is one of the most versatile and powerful ways to manage your workstations in your domain. However, using just basic Group Policy to object relationship links you can limit the customization that is possible with group policy. Today I will show you how to add WMI (Windows Management Interface) Filtering to your group policy. This will allow you to build a kind of rule, and allow you to pick and choose which workstations get the policy and which don’t. My goal today is to apply my group policy to only workstations that start with the name of shs-exam. This is basically all the workstations that reside in our exam rooms and I would like them to have a special set of settings, however I want them to co-exist in my Active Directory structure in the proper ‘departmental’ organizational units that I already have.
Requirementswmi-query

Configuration

  1. Open your Group Policy Management Console and browse to WMI Filters in your Domain.
  2. Go ahead and Right Click on WMI Filters and select New
  3. Give the WMI Filter a nice descriptive name and give more detailed text in the Description if needed.
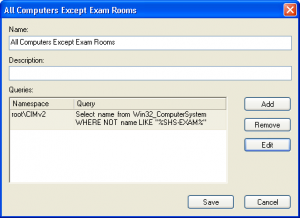
  4. To build your actual query for WMI you need to think of this as a question to ask the PC and if it returns any result then the Group Policy will be applied to it. The query I have built asks it to return name for the computer and if the name contains “SHS-EXAM” then it will return the name and get the group policy applied, if not then nothing happens and the group policy is skipped.
  5. group-policy-scope-wmi-filtering

  6. Add your WMI Query, mine is Select name from Win32_ComputerSystem WHERE NOT name LIKE “%SHS-EXAM%” This will basically select all computers that are not named “SHS-EXAM”
  7. Now press Save
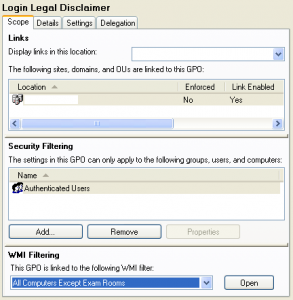
  8. Now that we have successfully made the WMI Filter we need to apply it to the proper group policy, so go to your Group Policy Objects under your domain and select the one you wish to add the filter to.
  9. The last section on the screen should be WMI Filtering, just drop down the list and select the WMI Filter you just made

Reference Material

  • WQL (SQL for WMI) (Windows) – This is a great list of advanced operators and examples to get you close the the proper syntax
  • HOWTO: Leverage Group Policies with WMI Filters – This article explains in detail how to create a WMI filter to determine the scope of a Group Policy based on computer attributes.
  • Paessler WMI Tester – This tool can help you test your WMI queries before deploying them in Group Policy use. I use this tool all the time to help find information about a workstation.
  • Microsoft Win32 Classes Reference – This is a Microsoft’s reference for all of the objects and events for WMI. You can use this to find that specific settings you need to filter on.

Read More

How to Setup a Legal Notice Before Login in Group Policy

A few days ago I was tasked with setting up a notice to users before the actually log on to the computer to notify them that if they use this computer they agree to blah.. blah.. blah legal stuff. To solve this, I decided that this would be good to see on every computer we have in the organization so I added it to the Default Domain Policy, but this can be applied to users or computers at any level you see fit. This is a very easy setting that may also substitute for signing the computer usage agreements every year.

    legal-notice-group-policy-settings

  1. Open up your Group Policy Management Console (gpmc.msc)
  2. Go to the Group Policy Object in your domain, right click on Default Domain Policy and select Edit…
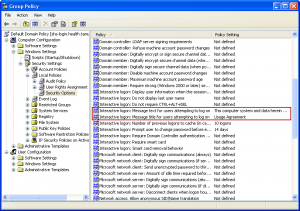
  3. Once the Group Policy Editor is up, using the treeview on on the left go to Computer Configuration > Windows Settings > Security Settings > Local Policies > Security Options
  4. To edit the title of the windows change: Interactive logon:Message title for users attempting to log on
  5. To edit the message text change: Interactive Logon:Message text for users attempting to log on

Read More