How to Remove Old Cached Roaming Profiles from Workstations

Earlier this year I was tasked with cleaning up the workstations on our network to help reduce the amount of time needed for our daily virus scan to complete. One of the issues I took on was cleaning up old cached profiles from the use of roaming profiles. This was not something I wanted to do manually for the 150 PCs that we have across our building, so I made a script that would look for profiles that had not been modified in the last 90 days and wasn’t a system account (localservice, networkservice, default user, all users). Also, an advantage of using a script to do this is it can produce a report of what it will remove without actually doing it. That way you can be sure that you are not deleting things that you do want to keep.

This script does depending on file and print sharing being turned on for the workstation so the script can access the administrative shares on each computer. It does make the assumption that your profiles are saved in the default windows location C:\Documents and Settings\%username% and that you are the administrator for the domain.

Configuration

  1. Be sure to update the LDAP string ‘LDAP://OU=workstations,DC=subdomain,DC=domain,DC=com’ to match your Active Directory structure. The script needs to know where all the workstation are in Active Directory
  2. Find objConnection.Open “DomainController” and modify the put your Domain Controller in place of DomainController
  3. Find OldProfile objRecordSet.Fields(“Name”).Value, “C:\deletedprofiles.csv” and modify the filename to save the file where you and and named what you want, just be sure to leave the extension as CSV so it will open properly with your spreadsheet application.
  4. Most Importantly – Comment out fsoFolder.DeleteFolder objSubfolder, TRUE if you just want a report of what it will delete when run, if not it is currently setup to remove the unwanted profiles
Const ADS_SCOPE_SUBTREE = 2

Set objConnection = CreateObject("ADODB.Connection")
Set objCommand =   CreateObject("ADODB.Command")
objConnection.Provider = "ADsDSOObject"
objConnection.Open "shs-login"

Set objCOmmand.ActiveConnection = objConnection
objCommand.CommandText = _
    "Select Name, Location from 'LDAP://OU=workstations,DC=subdomain,DC=domain,DC=com' " _
        & "Where objectClass='computer'"  
objCommand.Properties("Page Size") = 1000
objCommand.Properties("Searchscope") = ADS_SCOPE_SUBTREE 
Set objRecordSet = objCommand.Execute
objRecordSet.MoveFirst

Do Until objRecordSet.EOF
	OldProfile objRecordSet.Fields("Name").Value, "C:\deletedprofiles.csv"
    objRecordSet.MoveNext
Loop

Sub OldProfile(strComputer, strFilename)
	On Error Resume Next
	Set StdOut = WScript.StdOut
	 
	Set objFSO = CreateObject("scripting.filesystemobject")
	Set logStream = objFSO.opentextfile(strFilename, 8, True)
	 
	Set oReg=GetObject("winmgmts:{impersonationLevel=impersonate}!\\" & strComputer & "\root\default:StdRegProv")
	If Err.Number Then
	      logStream.writeline(strComputer & ",Offline")
	      Err.Clear
	Else
		On Error Resume Next
		Set objShell = CreateObject("Shell.Application")
		Set fsoFolder = CreateObject("Scripting.FileSystemObject")

		root = "\\" & strComputer &"\C$\Documents and Settings"

		Set objFolder = fsoFolder.GetFolder(root)
		Set colSubfolders = objFolder.Subfolders
		
			For Each objSubfolder in colSubfolders
				If (lcase(objSubfolder.Name) <> "localservice" AND lcase(objSubfolder.Name) <> "networkservice"_
					AND lcase(objSubfolder.Name) <> "default user" AND lcase(objSubfolder.Name) <> "all users") then
						
						If (DateDiff("D", objSubfolder.DateLastModified, Date()) > 90) then
							logStream.writeline(strComputer & ",Online,Delete," & objSubfolder & "," & objSubfolder.DateLastModified)
							fsoFolder.DeleteFolder objSubfolder, TRUE
						else
							logStream.writeline(strComputer & ",Online,Active," & objSubfolder & "," & objSubfolder.DateLastModified)
						End If
						
				else
					logStream.writeline(strComputer & ",Online,System," & objSubfolder & "," & objSubfolder.DateLastModified)
				End If
			Next
	End If
	logStream.Close
End Sub
Read More

List All Active Directory User Accounts in a CSV

We all know maintaining hundreds of user accounts can be frustrating especially when it comes to audit time and you need a good list of information to pass on to an auditor. Well today I am your savory, this simple script will produce you a list of users with some detailed information that can make audits or documentation much easier. The script creates a Comma Separated Values file or CSV that you can edit in Microsoft Excel or any standard spreadsheet application so you can customize the information before adding it to your report or audit. Below are the specific fields that this script will provide detail on for your Active Directory Users.

User Details

  • Name
  • Description
  • Profile Path
  • Home Drive
  • Account Disabled
  • Password Required
  • User Changable Password
  • Password Expires
  • SmartCard Required
  • Login Count
  • Last Login (date)
  • Last Password Change (date)
  • Created (date)
  • Modified (date)

Script Configuration
Before running this script there is some minor configuration that must be done so it can communicate with your Active Directory setup.

  1. Find objConnection.Open “Active Directory Server” change Active Directory Server to the name of your Domain Controller
  2. Find objCommand.CommandText = _
    “SELECT Name, description, profilePath, homeDrive, distinguishedName,userAccountControl FROM ‘LDAP://dc=subdomain,dc=domain,dc=suffix’ WHERE objectCategory=’user'”
    change subdomain, domain, and suffix to the name of your domain i.e. west consco com (respectively)
  3. Find Set logStream = objFSO.opentextfile(“C:\domainusers.csv”, 8, True) and change C:\domainusers.csv to the location where you want the file saved. Be sure to save it with the extension CSV
On Error Resume Next
Const ADS_SCOPE_SUBTREE = 2

Const ADS_UF_ACCOUNTDISABLE = &H0002 
Const ADS_UF_PASSWD_NOTREQD = &H0020 
Const ADS_UF_PASSWD_CANT_CHANGE = &H0040 
Const ADS_UF_DONT_EXPIRE_PASSWD = &H10000 
Const ADS_UF_SMARTCARD_REQUIRED = &H40000 
 
Set objConnection = CreateObject("ADODB.Connection")
Set objCommand =   CreateObject("ADODB.Command")
objConnection.Provider = "ADsDSOObject"
objConnection.Open "Active Directory Server"
Set objCommand.ActiveConnection = objConnection

objCommand.Properties("Page Size") = 1000
objCommand.Properties("Searchscope") = ADS_SCOPE_SUBTREE 

objCommand.CommandText = _
    "SELECT Name, description, profilePath, homeDrive, distinguishedName,userAccountControl FROM 'LDAP://dc=subdomain,dc=domain,dc=suffix' WHERE objectCategory='user'"  
Set objRecordSet = objCommand.Execute

objRecordSet.MoveFirst
Set objFSO = CreateObject("scripting.filesystemobject")
Set logStream = objFSO.opentextfile("C:\domainusers.csv", 8, True)
logStream.writeline("Name,Description,Profile Path,Home Drive,Account Disabled,Password Required,User Changable Password,Password Expires,SmartCard Required,Login Count,Last Login,Last Password Change,Created,Modified")
Do Until objRecordSet.EOF

	strDN = objRecordset.Fields("distinguishedName").Value 
	Set objUser = GetObject ("LDAP://" & strDN)
	 
	If objRecordset.Fields("userAccountControl").Value AND ADS_UF_ACCOUNTDISABLE Then
		Text = "Yes"
	Else
		Text = "No"
	End If
	If objRecordset.Fields("userAccountControl").Value AND ADS_UF_PASSWD_NOTREQD Then
		Text = Text & ",No"
	Else
		Text = Text & ",Yes"
	End If
	 
	If objRecordset.Fields("userAccountControl").Value AND ADS_PASSWORD_CANT_CHANGE Then
		Text = Text & ",No"
	Else
		Text = Text & ",Yes"
	End If	 
	If objRecordset.Fields("userAccountControl").Value AND ADS_UF_DONT_EXPIRE_PASSWD Then
		Text = Text & ",No"
	Else
		Text = Text & ",Yes"
	End If
	If objRecordset.Fields("userAccountControl").Value AND ADS_UF_SMARTCARD_REQUIRED Then
		Text = Text & ",Yes"
	Else
		Text = Text & ",No"
	End If
	
	logStream.writeline(objRecordset.Fields("Name").Value & ","_
		& objRecordset.Fields("description").Value & ","_
		& objRecordset.Fields("profilePath").Value & ","_
		& objRecordset.Fields("homeDrive").Value & ","_
		& text & ","_
		& objUser.logonCount & ","_
		& objUser.LastLogin & ","_
		& objUser.PasswordLastChanged & ","_
		& objUser.whenCreated & ","_
		& objUser.whenChanged & ","_
		)
		
    objRecordSet.MoveNext
Loop
logStream.Close

Read More

How to Deploy VNC using Group Policy

Do you spend too much time running from desk to desk just to help someone make a shortcut or change the default printer? This could be the solution for you. Using UltraVNC you can remotely view and control their workstation from your desk. This can save you time from running around everywhere, and make your users happier faster by solving their problems on the spot. You can also make your boss happy be making it authenticate with Active Directory. That will ensure that everyone that has the remote support access uses their own username and password, and it is easily managed with Active Directory Groups. VNC works very simply by installing a server on every workstation which allows it to share out the desktop to other clients / viewer programs. By installing the VNC Server on all your workstations it will allow you to connect using the client / viewer application and provide hands on support directly from your workstation.

Requirements

Making the MSI using VNCed
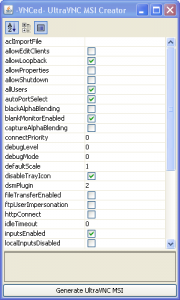
Now that you have the required software, the first thing we need to do is uncompress the VNCed UltraVNC MSI Creator to a folder on your desktop. Once completed, run the run.bat and it should popup a GUI interface you can use to configure different parts of the UltraVNC Server.VNCed UltraVNC MSI Maker
Using this interface you can adjust and explore what options you have to choose from to customize your UltraVNC Deployment for your environment. The defaults here are a pretty good start and you can click on each item to get a description of what it will change. You may want to install this to a test computer a few times before rolling it out.
At this time you also need to configure if you will be using if you will be using Active Directory Authentication or just a plain password.

– To setup the plain password just fill out the password item and leave the newMSLogon unchecked.
– To setup Active Directory Authentication check the newMSLogon and you will need to make a file to select for aclImportFile. This file can either be generated based on the UltraVNC Instructions or you can use my file by creating a text file called: MSACL.ini and pasting allow 0x00000003 "..\Domain Admins in to it. That will allow anyone in the Domain Admins group to have full access to any machine setup using this MSI.

Once you have finished configuring the options for UltraVNC hit the Generate UltraVNC MSI button at the bottom. This will generate your UltraVNC.msi in the folder in which VNCed was extracted to. This file is what you will use to deploy UltraVNC to your workstations.

Using Group Policy to Deploy the MSI
First you will need to open either your Group Policy Management Console (gpmc.msc) and either modify your existing Workstation Group Policy or make a new one just for the deployment of this application depending on how you want to deploy it. By making a different GP to install, it can allow you deploy it just to a few machines, and only change the settings on those machines, where as the workstation method installs it to all workstations. This really up to the requirements of your environment. Either way you will need to look under Group Policy Object for your domain and create one or right click on one and edit it.Group Policy Software Installation
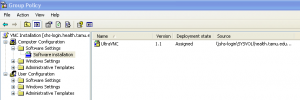
Now use the Tree on the Left to browse to Computer Configuration > Software Settings > Software Installation and right click on Software Installation and select New > Package… It will now prompt you with an open dialog box, go and select the MSI that we created earlier. If all goes well you should end up with something like the screenshot shows to the left. If all goes well now the only thing you have to do is link it to the OUs that you want it to effect if you created a new one , or you let your workstation group policy deploy to all the workstations the next time they restart.

Firewall ConfigurationGroup Policy Firewall Configuration for UltraVNC
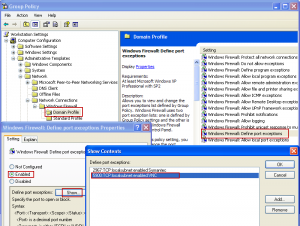
If you run a firewall on your machine you will need to allow port 5900 open. If you only running the default Windows Firewall you can configure this using the same group policy that you deployed UltraVNC with. Just go to Computer Configuration > Administrative Templates > Network > Network Connections > Windows Firewall > Domain Profile then select Windows Firewall: Define port exceptions select Enabled then click the Show… button and click Add and fill out the items to specification.

For any other questions you have feel free to leave a comment I will be happy to assist you with the deployment.

For any other detailed information about UltraVNC you should check out their website at http://www.uvnc.com

Read More

Disable Windows Games Using Software Restriction Policy

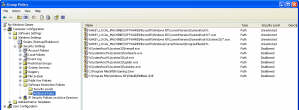
Do you find that your users spend more time in freecell and minesweeper than actually doing work? Then one would say that it is time to block those applications from being started. To do this you can use the Software Restriction Policy that is Built in to Group Policy and your Domain. What you will need to do is create a new Group Policy, you could call it “No Windows Games” and then Edit it and drill down into Computer Configuration > Windows Settings > Security Settings > Software Restriction Policies from there you will probably be presented with “No Software Restriction Policies Defined” now right click back on Software Restriction Polices in the tree view on the left and select Create New Policies. Now you should have the option for Additional Rules. This is where you need your restrictions. Here is the long article about what the different types of rules are, and what you can do with the from Microsoft, but since we just want to block Windows Games we just need to add a New Path Rules with the Disallowed option.

  • %SystemRoot%\system32\freecell.exe
  • %SystemRoot%\system32\mshearts.exe
  • %SystemRoot%\system32\sol.exe
  • %SystemRoot%\system32\spider.exe
  • %SystemRoot%\system32\winmine.exe
  • C:\Program Files\MSN Gaming Zone
  • C:\Program Files\Windows NT\Pinball\PINBALL.EXE

Once these restriction are in place you can link them to the OU or workstations to make them take effect. Your end result should look something like this:
No Windows Games Group Policy

Read More

Passing Parameters to VB Script to Map Network Drives

The other day I got an instant message from a fellow network administrator asking for a script that would map drives to by simply passing parameters from command line. This caused me to go into Google mode checking how parameters are passed in to Visual Basic Script and then applying the basic network drive mapping script. Now I feel that only the proper thing to do is share it with everyone out there that is looking for the same thing he was. This is a very simple script that does something equally simple. Hopefully this will simply some of the group policies that are out there.

Usage: mapme.vbs Z //server/share

This would result in passing Z as the drive letter and mapping it to the UNC path of //server/share

Set objArgs = WScript.Arguments
Set objNetwork = WScript.CreateObject("WScript.Network")
objNetwork.MapNetworkDrive  objArgs(0) & ":" , objArgs(1)

Read More