Do you spend too much time running from desk to desk just to help someone make a shortcut or change the default printer? This could be the solution for you. Using UltraVNC you can remotely view and control their workstation from your desk. This can save you time from running around everywhere, and make your users happier faster by solving their problems on the spot. You can also make your boss happy be making it authenticate with Active Directory. That will ensure that everyone that has the remote support access uses their own username and password, and it is easily managed with Active Directory Groups. VNC works very simply by installing a server on every workstation which allows it to share out the desktop to other clients / viewer programs. By installing the VNC Server on all your workstations it will allow you to connect using the client / viewer application and provide hands on support directly from your workstation.
Requirements
Making the MSI using VNCed
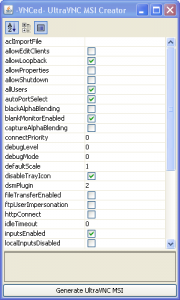
Now that you have the required software, the first thing we need to do is uncompress the VNCed UltraVNC MSI Creator to a folder on your desktop. Once completed, run the run.bat and it should popup a GUI interface you can use to configure different parts of the UltraVNC Server.
Using this interface you can adjust and explore what options you have to choose from to customize your UltraVNC Deployment for your environment. The defaults here are a pretty good start and you can click on each item to get a description of what it will change. You may want to install this to a test computer a few times before rolling it out.
At this time you also need to configure if you will be using if you will be using Active Directory Authentication or just a plain password.
– To setup the plain password just fill out the password item and leave the newMSLogon unchecked.
– To setup Active Directory Authentication check the newMSLogon and you will need to make a file to select for aclImportFile. This file can either be generated based on the UltraVNC Instructions or you can use my file by creating a text file called: MSACL.ini and pasting allow 0x00000003 "..\Domain Admins in to it. That will allow anyone in the Domain Admins group to have full access to any machine setup using this MSI.
Once you have finished configuring the options for UltraVNC hit the Generate UltraVNC MSI button at the bottom. This will generate your UltraVNC.msi in the folder in which VNCed was extracted to. This file is what you will use to deploy UltraVNC to your workstations.
Using Group Policy to Deploy the MSI
First you will need to open either your Group Policy Management Console (gpmc.msc) and either modify your existing Workstation Group Policy or make a new one just for the deployment of this application depending on how you want to deploy it. By making a different GP to install, it can allow you deploy it just to a few machines, and only change the settings on those machines, where as the workstation method installs it to all workstations. This really up to the requirements of your environment. Either way you will need to look under Group Policy Object for your domain and create one or right click on one and edit it.
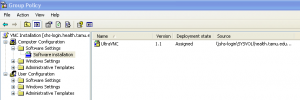
Now use the Tree on the Left to browse to Computer Configuration > Software Settings > Software Installation and right click on Software Installation and select New > Package… It will now prompt you with an open dialog box, go and select the MSI that we created earlier. If all goes well you should end up with something like the screenshot shows to the left. If all goes well now the only thing you have to do is link it to the OUs that you want it to effect if you created a new one , or you let your workstation group policy deploy to all the workstations the next time they restart.
Firewall Configuration
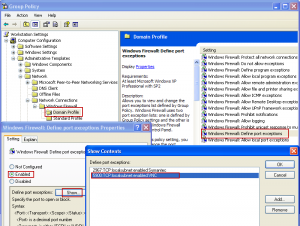
If you run a firewall on your machine you will need to allow port 5900 open. If you only running the default Windows Firewall you can configure this using the same group policy that you deployed UltraVNC with. Just go to Computer Configuration > Administrative Templates > Network > Network Connections > Windows Firewall > Domain Profile then select Windows Firewall: Define port exceptions select Enabled then click the Show… button and click Add and fill out the items to specification.
For any other questions you have feel free to leave a comment I will be happy to assist you with the deployment.
For any other detailed information about UltraVNC you should check out their website at http://www.uvnc.com
Outstanding post! It worked flawlessly.
One question: I’d like to install the “UltraVNC” folder to a location different than under “C:\Program Files\”.
I’m guessing there must be a string in one of the Java Class files with the installatin path.
Where would I make the path change?
Dave, I checked though the options in VNCed and did not see any options to change the installation path. I also checked the documentation for VNCed but didn’t come up with anything, however, you might try making the MSI as described in the post and then use a utility like ORCA to modify the MSI and change some of the parameters within the MSI. I did this once installing some old software that was looking for a specific MDAC version in Win2000 but wouldn’t recognize the version that comes in Win2003. Hope this gets you in the right direction.
Wayne, Good work. It worked as Dave pointed out flawlessly here to. But I have a doubt of the deployment process. Everytime the user logs on to the machine the software (ultraVNC) will be installed?
Best Regards!
Andre,
In my deployment, I used Computer Policy to install the application and it seems to do it when the computer is starting up before the user logs in.
In my experience it doesn’t try to install multiple times, maybe if you assigned the software using User Policy I could see how that might happen but I would think it would detect that the required software is already install and that policy requirement is met.
[…] installation by Group policies @ this site http://www.waynezim.com/2009/05/how-to-deploy-vnc-using-group-policy/ there is a good tutorial for network installation of VNC […]
nice tutorial – it works fine for windows xp
if i try to install the msi package on a windows 7 client i receive the following error
“The Installer has encountered an unexpected error installing this package. This may indicate a problem with this package. The error code is 2755.
any ideas?
thanks
Great post, worked well after a bit of tinkering. I used this to write a slightly updated guide on my blog using VNCed UltraVNC creator 1.1.8 and deployment via server 2k8. Exactly the same concept though.
Cheers!
[…] http://www.waynezim.com/2009/05/how-to-deploy-vnc-using-group-policy/ […]
[…] http://www.waynezim.com/2009/05/how-to-deploy-vnc-using-group-policy/ […]
Quality. Thanks.
[…] as they may have work they need saving etc. I created an MSI package following this guide here: How to Deploy VNC using Group Policy | Wayne Zimmerman's Blog Reply With […]
[…] originally followed Wayne Zimmerman’s guide and just updated it for use with the latest […]
I have completed and access to screen of vnc server, however i can’t control it, please help me, thnks so much!